LearnDash Tutorial for Creating Courses and Selling Them with Easy Digital Downloads
More and more people and businesses are monetizing their content and websites by offering online courses. I think it’s a really smart idea. LearnDash is one of the leading LMS (Learning Management System) plugins available today, certainly the most complete. By itself, you can sell courses online. However, that’s a little limiting in terms of how you accept payments and offers you can provide. LearnDash, however, has a ton of payment integrations such as Exchange, WooCommerce, and my favorite, Easy Digital Downloads. Today, I’m going to talk about how to set up a basic course using LearnDash + EDD.
Setting up a course and selling it using LearnDash and EDD is a relatively low investment. Really, the cost of LearnDash ($99 – single site) and EDD + a payment gateway (only necessary if you don’t use Paypal and want to process credit cards) will run you less than $200.00, which might seem like a lot, but it’s not. $99, plus the price of a payment gateway for Easy Digital Downloads ($49 – single site) is still less than $150.00. Not too shabby, considering what you get with that.
Just so you know…
Setting up a course, even a simple one takes a lot of work and a lot of planning. Definitely plan your course out before you get started. Once you’ve done that there is a lot of stuff that has to be taken care of first, before you can sell your course; so, yeah, just know that going in. While I’ve used WP Courseware and Sensei, they are not as feature-complete as LearnDash and LD have gotten so much better in the last year, so I do highly recommend them.
Getting Started (What you need to have)
- First, let’s grab a copy of LearnDash, the $99 dollar version will work just fine although I believe the $129 version with ProPanel is a greater value.
- Also, very important, be sure to get the LearnDash EDD integration add-on.
- Next go grab your free copy of Easy Digital Downloads
- Optional: EDD Payment Gateway such as Stripe or Authorize.net; only required if you want to charge via credit card and not just Paypal.
- A self-hosted WordPress Website. I’m hoping you’ve already got this in place; this article doesn’t cover how you install WordPress.
Creating Your Course
Once you have all your plugins installed and licenses activated, I think it’s high time to figure out your course structure. This is something you should do on paper, or in a Spreadsheet, or similar. Don’t even touch LearnDash before you’ve planned your course out! That’s how I put together courses and that’s how to advise clients doing the same.
LearnDash has a few tiers to their course setup. Courses >> Lessons >> Topics and then you have quizzes.

Courses are your overarching piece of content; it’s the piece of content that ties all your course content together; that is, your lessons, topics will be associated to the appropriate course.
Lessons are another layer of course material that your students can progress through. You can associate multiple lessons to a single course, or even to multiple courses. For our purposes, I think it’s a good idea to keep things simple, for this tutorial.
Topics are yet one more layer and a recent addition to LearnDash core. Topics can be used with and associated to lessons. So you can assign many Topics to a single lesson and so on.
With the above diagram in mind, ask yourself: What will your course look like? What lessons and topics will it have? What sorts of quizzes will you have?
This should go without saying, but you should have all LearnDash plugins/addons as well as EDD and your other addons installed before proceeding. Got it? Good!
Create a Course
- LearnDash Course > Add New. We’re not going to enter all the details yet. We just want the course created so we can associate it with EDD. So once you’ve created and saved your course, let’s move on!
Create Your Easy Digital Download
- This is probably the easiest and least involved step in this whole thing. Go to “Downloads” then “Add New”
- Fill in the product details and pricing. I’d like to highlight two things here: Downloadable files associated with the purchase and also the Notes meta box. I know the course is virtual, but using downloads can be used to attach and distribute a course syllabus or coupons or something else. The notes field can be used to provide instructions after the transaction has been made.
- Associate your product with a Course; simply select the course (you can choose more than one) to associate with your product. That’s it. When someone purchases this product, they will be auto-enrolled into the associated class(es).

Finish Creating Your Course
- Let’s head on back to the course that you previously created…
- Fill out the relevant parts about your course—as you would a normal page or post. Keep in mind that the content you place here will be viewable even if someone hasn’t enrolled/purchased your course. So keep it descriptive and compelling so people will want to sign up.
- Fill-out the “Course” Metabox information. Course materials accept HTML. This field is also viewable to non-enrolled users. Simply, this area just lets people know what they need in order to complete your course.
— Course Price Type: This field is important. This is where you choose if the course is free for any who enroll; the course is a paid course or if it’s a recurring subscription. We’re going to keep it simple for now. So choose “closed” for the Course Price Type.
— Enter a Custom Button URL: Selecting “closed” for the course price type will produce a button on the Course page prompting a non-enrolled user to click the button to get access. The link should go directly to your Easy Digital Download Product you created in previous steps.


Create Your Lessons
LearnDash lets you create many lessons and then associate them to your courses. Lessons allow you to take a single course and organize it into separate sections and modules; or lessons if you will

- Associate your lesson to a course.
- Forced Lesson Timer – Optional, but you can use this to set a timer for your lesson. Pretty straight forward. The minimum time a user has to spend on Lesson page before it can be marked complete. Examples: 40 (for 40 seconds), 20s, 45sec, 2m 30s, 2min 30sec, 1h 5m 10s, 1hr 5min 10sec
- Upload assignment – You can force students to upload their “homework” for each lesson.
- Sample Lesson – Allows you to give away the lesson for free, if you want, which is a great way to give a sampling of your course materials to students. Pick a good lesson
- Lesson Visibility: The last two options allow you to configure a “content drip” for your course content. There are many reasons that someone may want to drip their content out. One primary use-case is to prevent people from buying the course, getting all the stuff, downloading and then asking for a refund.
Create Your Topics
Topics are similar to lessons. Topics allow you to further breakup your single lessons into multiple “chunks.” This is a recent addition to LearnDash, taking a page out of Sensei’s notebook. You’ll notice there are fewer options here, and that’s fine because we’ve already had to create so much stuff!

- Associate your course
- Associate your lesson
- Decide on a timer for the course and whether or not they need to upload a document with their topic
– You’ll notice there are no content drip options here.
Create Your Quizzes
Quizzes. You hate taking them—if you’re not a weirdo! =) I’m kidding. Quizzes are a great way for your course takers to demonstrate the value they’ve gained from taking your course. Especially useful if you plan to provide a certificate of completion or something that the course taker can print up to demonstrate the fruits of their labor and acquired knowledge. One of our clients, a yoga instructor, is now doing this.
Configure Your Quiz
The first thing you’ll notice is that the Quiz Configuration page looks like the ‘Dodd-Frank’ bill… Not to worry, though! It’s not as bad as it looks. You can click this image below to see a larger version of the various options.
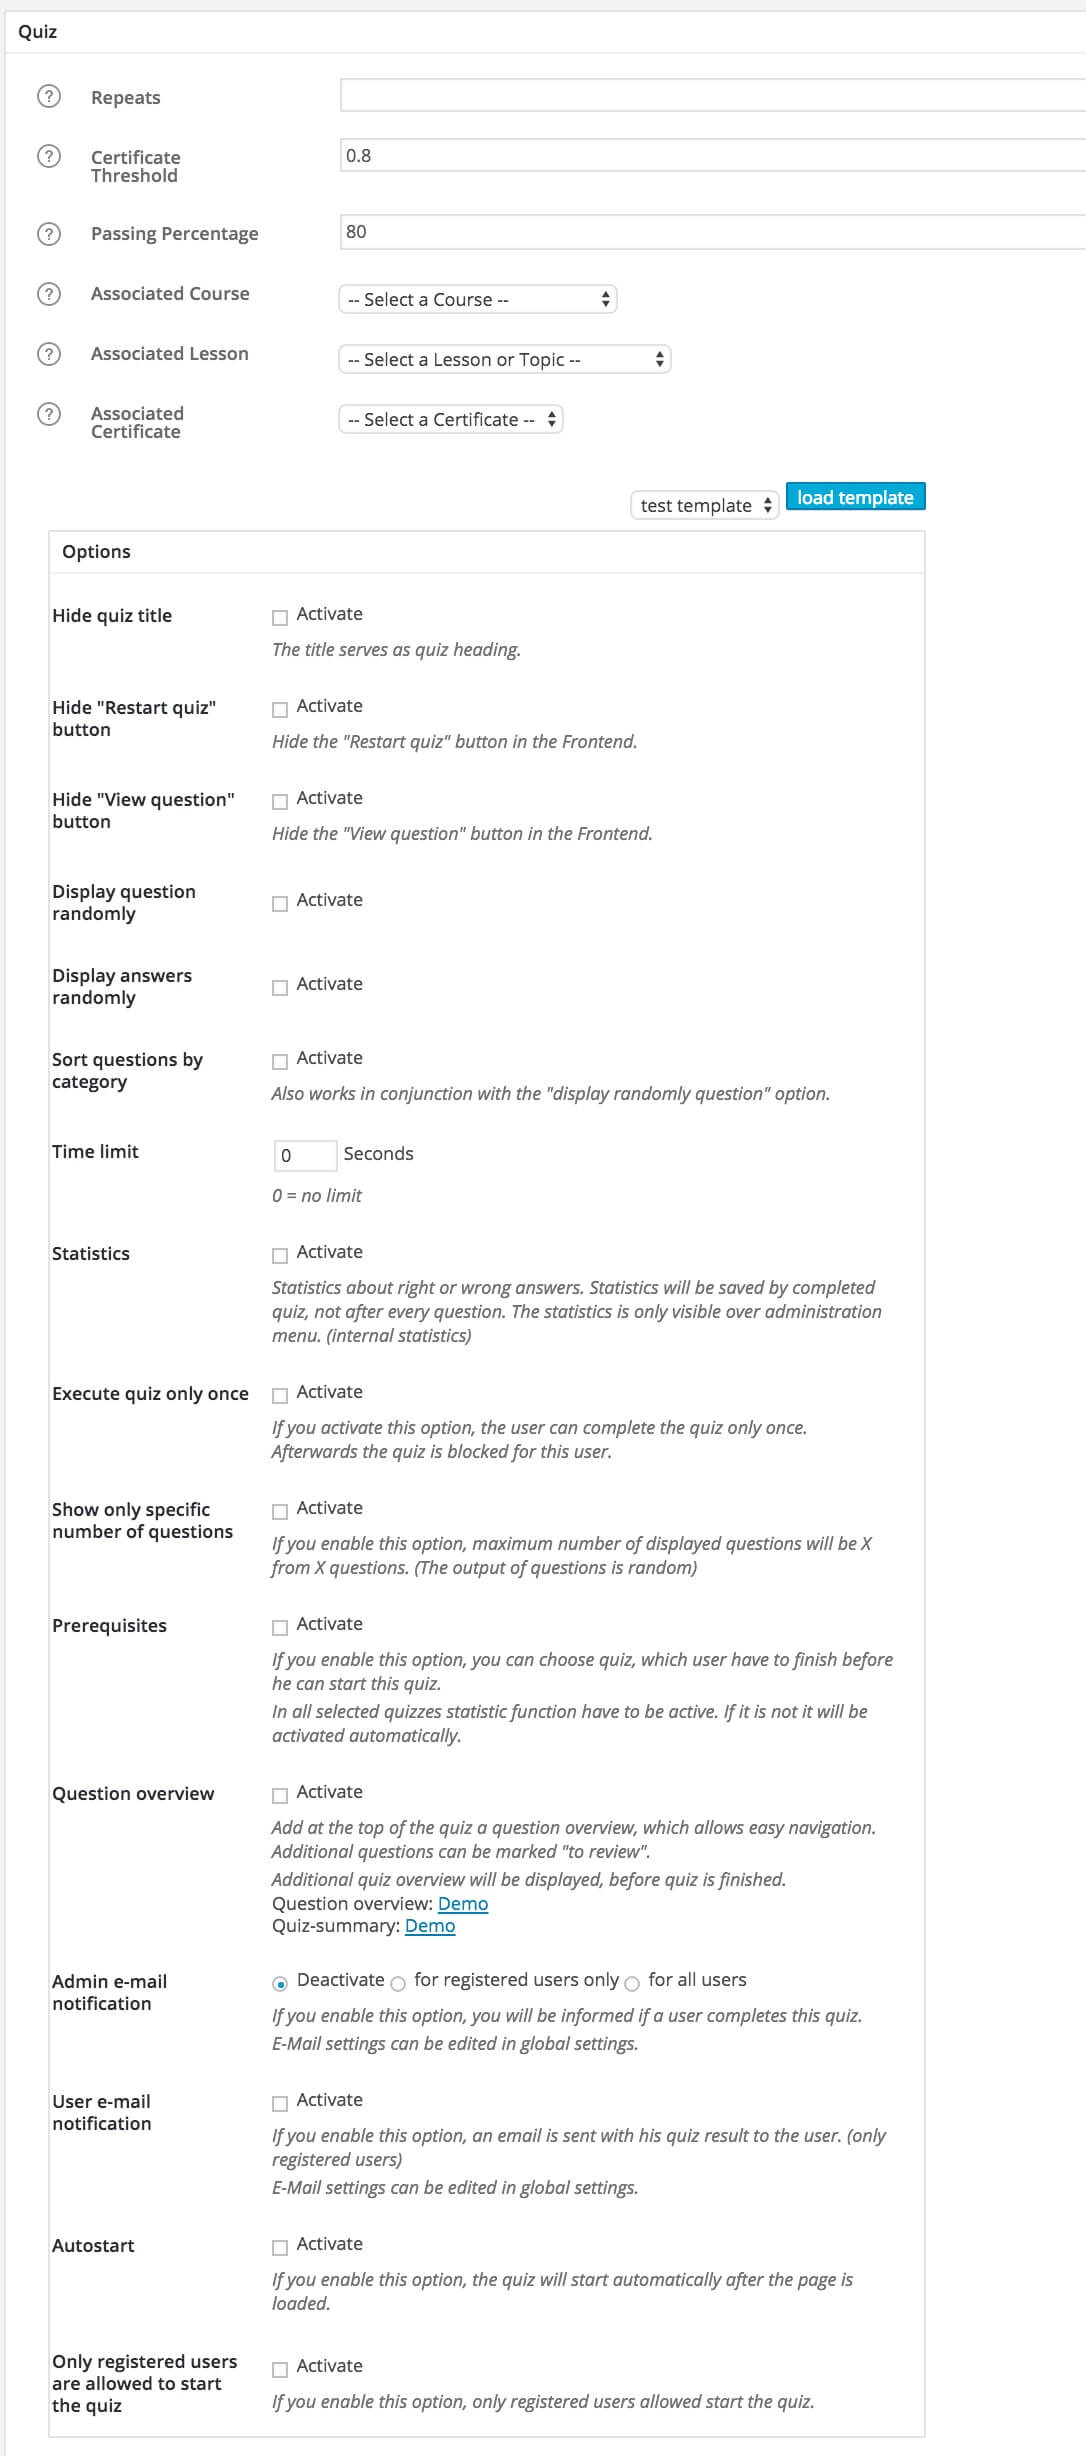
For the purposes of this tutorial, we’ll keep it to the point with the areas I think you should pay attention to. Deal?
- Under LearnDash go to ‘Quizzes’ and ‘Add New’
- In the Quiz Metabox set the number of times a student can retake a quiz. Your needs may require one redo, or not, but you have the flexibility to change this.
- Passing Percentage and Course Threshold provide a means of ensuring a test taker must pass an exam based on their own criteria.
- Associated Course, Lesson and/or Topic. I hope this part is self-explanatory. Assign, first, any quizzes you plan to run.
- Further down on the options, the one thing I’d highlight is the ‘randomize questions’ option. I normally recommend that, so a test taker doesn’t get ballsy and try to cheat.
Further, down the quiz options page, you get to ‘Quiz-Options,’ ‘Result options,’ and so on. The multitude of options is enough to make you bleed from your good, am I rite? Again, keep it simple; you don’t really need this stuff, mostly, which is why we’re not covering the Quiz options in great depth.
You can modify the user experience of how the test is taken, question summaries appear on a question and so on. Also, there’s a leaderboard feature which can be used to help test takers see how they’re doing and not bother you directly. Isn’t that nice!? So why don’t we take a jaunt down the various quiz options to see what is what?
- Options – I’m basically going to highlight the points I think are worth noting here.
— Time Limit: Obviously this lets you set a limit for the test taker to complete their quiz
— Display Questions Randomly: Let’s you change the order of the questions being given.
— Execute Quiz Once: Allows a quiz to only be taken one time
— Prerequisites: You may choose to force test takers to finish other quizzes before taking the current quiz
— Admin e-mail notification and User e-mail Notification: Obviously, you can send a specific notice to the admin and the test taker upon their completion of a quiz
— Only Allow Registered Users to take the test: Pretty self-explanatory. In addition to being enrolled in the course to take the quiz, the user must also be registered in WordPress as a user. This is important to note because, by default EDD does NOT create a user account when someone purchases a course. - Question Options
— Show Points: Shows in the quiz, how many points are reachable for the respective question.
— Numbered answers: This is best illustrated by the following screenshot. Click it to enlarge.
 — Hide correct and incorrect messages: You may choose to let people know how they did with an answer on their quiz with this option by providing information as to how the test taker did with the question
— Force user to answer each question: No rest for the weary test taker. Make that person answer ALL THE QUESTIONS!!! - Result Options
— Show average points: Make sure you enable the ‘statistics function’ in the Options section first for this to work. To see a demo, click the image to enlarge.

— Show Category Score: So, with your questions, you can assign them a category. If you did that, then you could provide a score based on a specific category, which is good to know for your students in the course. Maybe they suck at math or some other category; knowing that information provides valuable insight for the test taker. - Quiz Mode
— Normal: All questions are displayed sequentially.
— Normal w/ Back Button: Same as above, but allows the test taker to go back to previously answered questions
— Check to Continue: Provides a “next” button to go to the next question upon answering the current question
— Questions below each other: Stacks all questions on top of one another on a single page - Leader Board (Optional)
— The leaderboard is independent of the stats function within all quizzes. This provides a public list, that students can see, that shows how a student and their colleagues are doing on a given quiz. - Custom Fields (Optional)
— Custom fields can be enabled to collect different information from students at the start or conclusion of the given quiz. If you wanted to collect the test takers email, there’s a field for that. If you wanted them to provide feedback on the quiz, there’re fields that would allow for that, too. Be creative! - Results Text (Optional)
— This text can be generated at the end of a given quiz. Also, note the ‘Activate Graduation’ checkbox. This allows a user to self-complete their course upon submission of the Quiz if they pass and if you’ve configured certificates, they can automatically receive it!


After all, that setup is sure to save your quiz as a template, especially if you’ll plan on having other such similar quizzes in the future.
Question Type Overview
As a course admin, you have a lot of options for questions you can assign to a quiz; let’s talk about some of those options.
- Single Choice — This question type allows you to have a list of potential answers and allows you to assign point values to each one. So even though a chosen answer may be incorrect, the test taker still gets some points.
- Multiple Choice — Similar to the above, but there’s only one right answer.
- Free Choice —
- Sorting Choice — This allows your users to sort answers via drag-and-drop; so they can set the right order or priority as an answer to a given question. Using this question to test a user on steps to take while making a cake is a decent example of how to use this question type.
- Matrix Sorting — Similar to Sorting Choice, Matrix Sorting allows a user to match up two columns of answers with one another; so you can relate two columns of information together.
- Cloze — This question type allows users to write their own answers. They get points based on whether or not they use a word that you’ve enclosed in curly braces like so: {sample word}.
- Assessment — In this question type you can provide a user a means of providing an answer based on a scale such as 1 to 10 by doing the following:


Getting dirty with LearnDash
Configuring Your Plugins
Of course, we already added our EDD product that is related to our LearnDash course. But we weren’t quite done. Fortunately, the rest is pretty easy.
Setting up payments
Now you have a course to sell. Fortunately, EDD has many ways for you to accept payments, whether that is to take PayPal, Credit Card or Diner’s Club (Yeah, I just said that, so what?). You can review available payment gateways here. Get the one that suits you best. Each gateway has documentation on how to set it up and what information is required.
Enabling the appropriate gateways can be done by going to ‘Downloads’ > ‘Settings’ and ticking the boxes for the appropriate gateway.

Learndash Permissions
At a basic level, LearnDash is pretty secure out of the box and requires minimal amounts of setup.
ADVANCED THEMEING
Advanced theming is beyond the scope of this article. The thing that you will find when using LearnDash with a WordPress theme is that there are inconsistencies that you will inevitably run into. For instance, you may find course pages with comments enabled, or that show tags and categories where it doesn’t make any sense, for instance. To get around that, there are filters that can be written to remove these hiccups. Or you can use template overrides. Fortunately, it’s not too hard, if you’re a seasoned WP theme developer. You can just write a filter to override the content you want, or add the appropriate template file. An easier option is to find a LearnDash theme that is optimized specifically for it. Either way, it’s something that you need to keep in mind as you build your site out.
Conclusion
Whew! I never thought I’d be done with this article! You probably feel the same way at this point. While the setup can be rather lengthy, it’s not too hard to get things going and creating an absolutely awesome platform for selling your knowledge in the form of course material online.
Here are some further resources for you:
- LearnDash Website
- A social BuddyPress and LearnDash enabled theme
- LearnDash Theme (Derrick) using Genesis Framework (Genesis is a separate purchase).
Get Notified When We Publish New Content!
Join more than 2,500 people who get our marketing automation, business marketing, and WordPress news!


![[Slides] WordPress Plugin Basics and Discussion at LAdobe Design Meetup](https://digisavvy.com/wp-content/uploads/2016/06/Screen-Shot-2016-06-24-at-8.39.57-AM-768x343.png)

What a fantastic resource Alex – well done!
Thanks, Justin. It’s quite an awesome thing you’ve done with LearnDash. We’ve done so much with it and felt it was time to write something up on LD. =)
Thanks for the great tutorial on getting this set up. I followed the instructions, but students are being auto enrolled after payment. Did I miss a step? Thx.
Hi Trish,
Thanks for the comment. Do you not want customers to be auto-enrolled? That’s the default action unless I’m misunderstanding something here.
Very detailed, Alex! A good resource for LearnDash users.
Thanks, Ahmad. Just taking a page out of your very large book. =)
Hi Alex,
Kudos for this step by step process to setup LearnDash along with EDD on a site.
LearnDash setup is easy but when if you are planning to create a full fledged LMS solution then you need professionals to work on it.
We got number of clients asking for such service hence we came up with LearnDash LMS Setup https://wisdmlabs.com/learndash-lms -setup/ service which includes all the features or solutions that goes well with a LearnDash LMS.
Thanks again for en-lighting us.
I’m not seeing where you do step 3: “Associate your product with a Course; simply select the course (you can choose more than one) to associate with your product. That’s it. When someone purchases this product, they will be auto-enrolled into the associated class(es).” Is this inserting a hyperlink to the course? I can’t find anything that looks like the screenshot that is provided.
I have done everything that you said and yet when I have a customer sign up for the Learndash course, they pay for the course, it gives them the receipt and then nothing. If they go back to the course page, they are not able to access the actual course. It just takes them back to the add to cart page. What am I missing?
Thanks,
Troy
Troy, are you able to provide screenshots of your EDD product configuration and your Course Configuration? Like so:
EDD Download config: https://digisavvycdn.s3.amazonaws.com/Edit_Download__CLU_Passport__WordPress_2016-07-18_11-47-29.png.
Does your course have a field for “purchase button shortcode?”
Troy,
Did you figure this out ? I have the same problem.
User can buy. EDD creates a completed transaction. But then nothing. WP does not create a user and neither does the user get added in LearnDash course.
How to automate ?
Troy, are you able to provide screenshots of your EDD product configuration and your Course Configuration? Like so:
EDD Download config: https://digisavvycdn.s3.amazonaws.com/Edit_Download__CLU_Passport__WordPress_2016-07-18_11-47-29.png.
Does your course have a field for “purchase button shortcode?”
I had the very same issue. I like that it asks for name and email, and that it redirects to a thank you page with purchase status, that’s awesome. And, it actually registers the purchase in the backend of WordPress, where as LearnDash was incapable of receiving that message from PayPal.
However, no user was created, and there’s no one assigned to the course that I made. To answer your question, yes there is a field for purchase button shortcode, and yes there is code inside of it.
Hi,
I have the same problem as Troy, a customer in EDD, but nothing in WP users neither in Learndash course. The “Is this a LeardDash course?” is checked
any idea?
M.
I had the same problem and the guys at LearnDash helped me.
Make sure you have selected:
Download/Misc/Checkout Settings
-Disable Guest Checkout (checked)
-Show Register / Login Form? (Registration and Login form)
and everything should be find
Just like Brad, Mike, and others have said, I do not have the “Is this a Learndash course” options inside EDD. It’s simply not there. This has to be a plugin as it is not standard with EDD.
The “is this a Learndash course” option inside EDD is available after you install the LearnDash EDD integration add-on/plugin mentioned at the beginning of the article.