Restoring Your Website on SiteGround Hosting

Step 1. Submit a support ticket! Have it answered in 5 minutes and be done!! There. End of article. =)
Oh, wait, you wanted an actual how to? Oh, I think I can help you with that. So let’s get to it!
While some hosting companies are going down the tubes, other hosting companies continue to “up their game” and raise the bar in service excellence. One of those companies is SiteGround. They’re a partner that we recommend to our own clients, along with another choice option. One of the great things about SiteGround is that they’re inexpensive, yet feature packed and responsive to support requests, if you ever find yourself in a bind.
Some of the great features you can expect from SiteGround is daily Malware scanning; performance boosting cache and more. But, one of my favorites, of course, is backups. Good ol’ daily snapshot backups of your file system and database. Boom!
So…
Let’s restore a website!
If “Step 1” was a let down, let’s just skip on over to “Step 2!”
- Step 2 – Login to your SiteGround account
- Step 3 – In the ‘My accounts’ tab, click the ‘Manage Account’ button for the account you wish to restore, if you have more than one account each account will have a button you can click
- Step 4 – Next, you’ll click the ‘Go to cPanel’ button
- Step 5 – In cPanel, scroll toward the bottom and look for the ‘Backups Manager’ section.
Now, this is where things split up a bit. Keep reading for the file restore piece, or skip to the MySQL part of the article.
Restoring Files
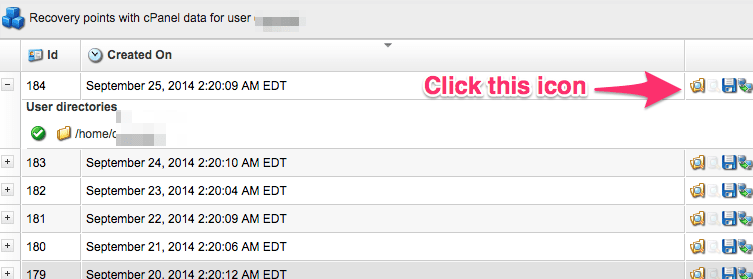
- Click ‘Files Backup Restore’. You will be presented with a list of snapshot backup dates. Pick the one you wish to restore, but clicking the folder icon associated with the date you want to restore a backup from.
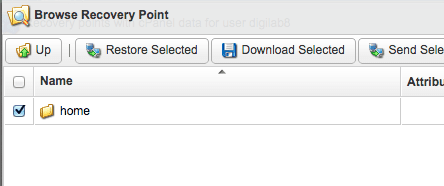
- Next, you’ll see a folder that says ‘Home’. Now, here, you have a couple of options. You can restore everything in your website, each account, sub-domain etc. by clicking the checkbox next to home and then clicking the “Restore Selected” button. Alternatively, you may double-click the home folder to further drill down into your account files. This is great because you can choose only specific files to restore, rather than your whole website, so this way definitely saves time!
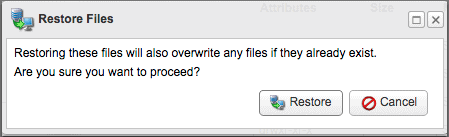
- Lastly, you’ll have a nifty warning popup telling you that you risk overwriting any files with the files you’re looking to restore. That’s okay; that’s what we want to do here. Right?
 Now depending on what you chose, your restore should be done in no time. Obviously, if you’re doing a full account restore of your files, you’ll have time to rest, think about your life and basically feel like you’re too cool for school.
Restoring your MySQL Database
- Back in cPanel, also under the Backups Manager section, click the ‘MySQL backup restore’ option
- The first thing to do on the next screen is to select the backup date for the database you wish to restore.
- In the panel to the right, you will see a list of databases you can restore.
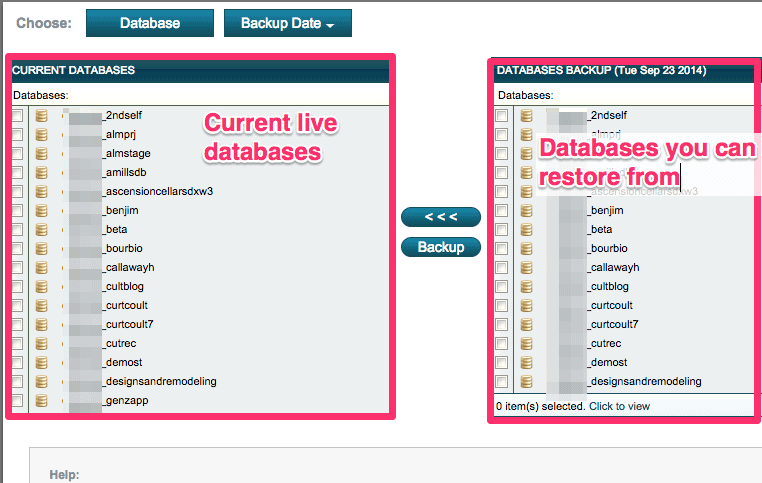
- From the right panel, select the database you wish to restore from; from there, in the panel on the left you’ll click the database you’re going to restore over. Meaning, that the database you choose to restore from the right panel, will overwrite the database you select in the left panel.
- Once you’ve made your database selections, simply click the button with the three angle brackets “<<<“, follow the prompts and your db will be restored in a matter of no time.
Hope this helps somebody some day because your backups are only as good as your successful restore attempt.
Get Notified When We Publish New Content!
Join more than 2,500 people who get our marketing automation, business marketing, and WordPress news!


Great write-up Alex. Siteground hosting rocks. I really like their service and support.